Guide · Skylos Cloud · about 30 minutes, most of it waiting for CI
Compliance reports, step by step
From a repository to a signed report your auditor can check. A Skylos compliance report turns trusted CI scans, fix deadlines and approved exceptions into evidence for SOC 2, OWASP Top 10, PCI DSS, ISO 27001 and more. It is evidence for an assessor, not a certificate.
Before you start
- A Skylos Cloud workspace on any plan, with at least 500 credits for one report.
- A repository on GitHub with GitHub Actions, or another CI system that can store a secret.
- Owner or admin rights in the workspace to connect the repository; member rights to generate.
Step 1 of 9
Add the repository to Skylos Cloud
Sign in at skylos.dev. On Home, under Add your first repository, connect GitHub or add the repository. Each repository becomes a project in your workspace. A workspace owner or admin does steps 1 to 3; any member can generate a report later.
What you see: the project on Home. It has no scans yet, which is expected.
Step 2 of 9
Connect GitHub and merge the Skylos workflow
Open the project, then Project settings, section Repository & connection. Under Merge blocking on GitHub, click Connect GitHub to install the Skylos GitHub App on the repository, then Open the workflow pull request and merge it. The workflow scans every push to your default branch and uploads the result with GitHub OIDC, so nobody handles a key. A scan from GitHub counts as trusted only when it comes from .github/workflows/skylos.yml on the default branch and the GitHub App is installed.
# What the Skylos workflow pull request adds (.github/workflows/skylos.yml),
# trusted branch scan job, simplified. Do not rename the file: Skylos only
# trusts GitHub OIDC uploads from .github/workflows/skylos.yml on the
# default branch.
on:
  push:
    branches: ["main"]
permissions:
  contents: read
  id-token: write
# ...installs Skylos, applies your project's Cloud policy, then runs:
#   skylos . --sca --upload
# Security and secret checks come from the Cloud policy (on by default).
Prefer the CLI? skylos cicd init writes the same file name, and its upload job sends the full scan. A workflow from Skylos 4.50.1 or earlier adds --baseline to the upload step, which filters findings before upload, so those scans never count: re-run skylos cicd init, or remove --baseline from the upload step.
pip install skylos
skylos cicd init
git add .github/workflows/skylos.yml
git commit -m "Add Skylos CI"
git push
Not on GitHub Actions? In Project settings, CLI & CI credentials, tick CI key (stored only as a CI secret) and create a key, store it in your CI as SKYLOS_TOKEN, and run the upload on pushes to the default branch. Never mark a key that sits on a laptop: keys from skylos login are always unverified and never count. Without the GitHub App, Skylos assumes the default branch is main; if yours is not, choose Another branch and enter it when you generate.
# In any CI system, on pushes to the default branch.
# SKYLOS_TOKEN: a project key an admin marked as a CI key, stored as a CI secret.
pip install skylos
export SKYLOS_BRANCH=main                    # the branch this job scanned
export SKYLOS_COMMIT="$(git rev-parse HEAD)"
skylos . -a --upload
Scans Skylos Cloud runs itself (Scan this repo, and every push once the GitHub App is installed) are trusted too and run security, secret and dependency checks. They skip files over 5 MB; a repository with such files needs the CI upload.
Step 3 of 9
Make the scan complete
A report counts a project only when the uploaded scan says it covered the whole repository and ran every check. Before you push, check that:
- The scan runs on the repository root, without
--select,--diff,--baselineor extra exclude folders (on the command line or in the Skylos config). - Security, secret and dependency checks run (
-aturns on all of them). - Every file can be analysed. A syntax error, or Dart code without
skylos[dart], makes the scan incomplete; with a current Skylos CLI, Step 1 on the Compliance page names each file and why (older versions: the CI log lists them). - Every dependency Skylos finds has a resolved version: an exact version in the manifest, or a version range such as
^2.1.0or>=2.0that a lockfile Skylos reads pins (uv.lock,poetry.lock,Pipfile.lock,package-lock.json,pnpm-lock.yaml,yarn.lockorbun.locknext to the manifest). A range no lockfile pins makes the dependency check incomplete, and so does a repository with no supported manifest.
Inline suppression comments (skylos: ignore, noqa) and Skylos config that narrows results (confidence, ignore or whitelist settings) do not stop a project counting. The report discloses them for that project: the findings they hide are never uploaded, so it cannot count them or show who accepted them. Record accepted risks as exceptions in Skylos Cloud instead; the report lists those with who approved them.
What you see: after you push to the default branch, the scan appears on the project with the label Verified CI upload (or CI API key upload). An upload labelled Unverified upload does not count.
Step 4 of 9
Check readiness on the Compliance page (free)
In the dashboard, open Audit reports, then Compliance reports (/dashboard/compliance). Step 1 lists every project and says whether a report would count it, using the same scan selection as the report itself. It reads scans only, never findings, so it costs nothing and does not reveal the result.
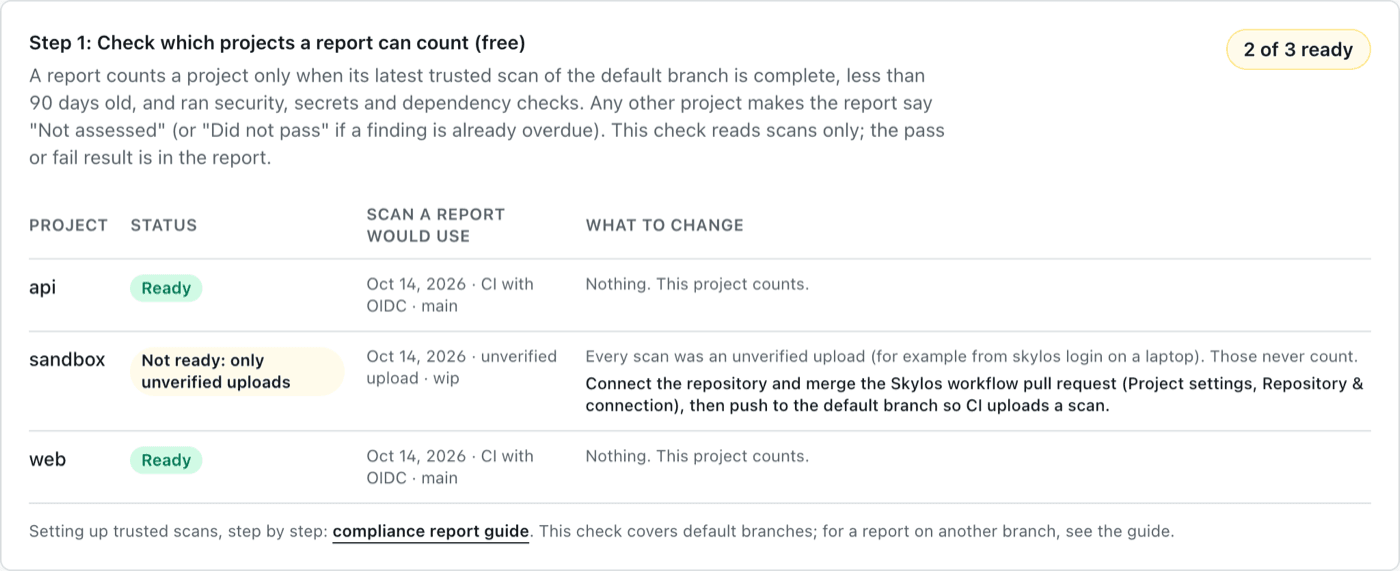
Fix every project marked Not ready, or leave it out of the report in the next step. Projects that are not ready make the report say Not assessed, because Skylos will not give a pass for code it has no trusted, complete, recent scan of.
Step 5 of 9
Optional: set business criticality and fix deadlines
The report prints each project's business criticality on the cover. Owners and admins set it in the Business criticality section of the Compliance page; it saves at once and applies to reports generated from then on.
Fix-by dates come from your fix deadlines in Policy, Quality gate, Fix deadlines. Without them, the report uses Skylos defaults for the findings the policy covers: 7 days for CRITICAL and 30 days for HIGH, from the day a finding was first seen.
Step 6 of 9
Generate the report
In Step 2, find your framework (SOC 2, OWASP Top 10, PCI DSS, ISO 27001, HIPAA, CWE Top 25, NIST SSDF and the AI governance frameworks) and click Generate report (500 credits, once). Pick All projects or Only the projects I pick, keep Each repository's default branch, then click Generate and charge 500 credits. If a selected project is not ready, the panel says so before you pay.
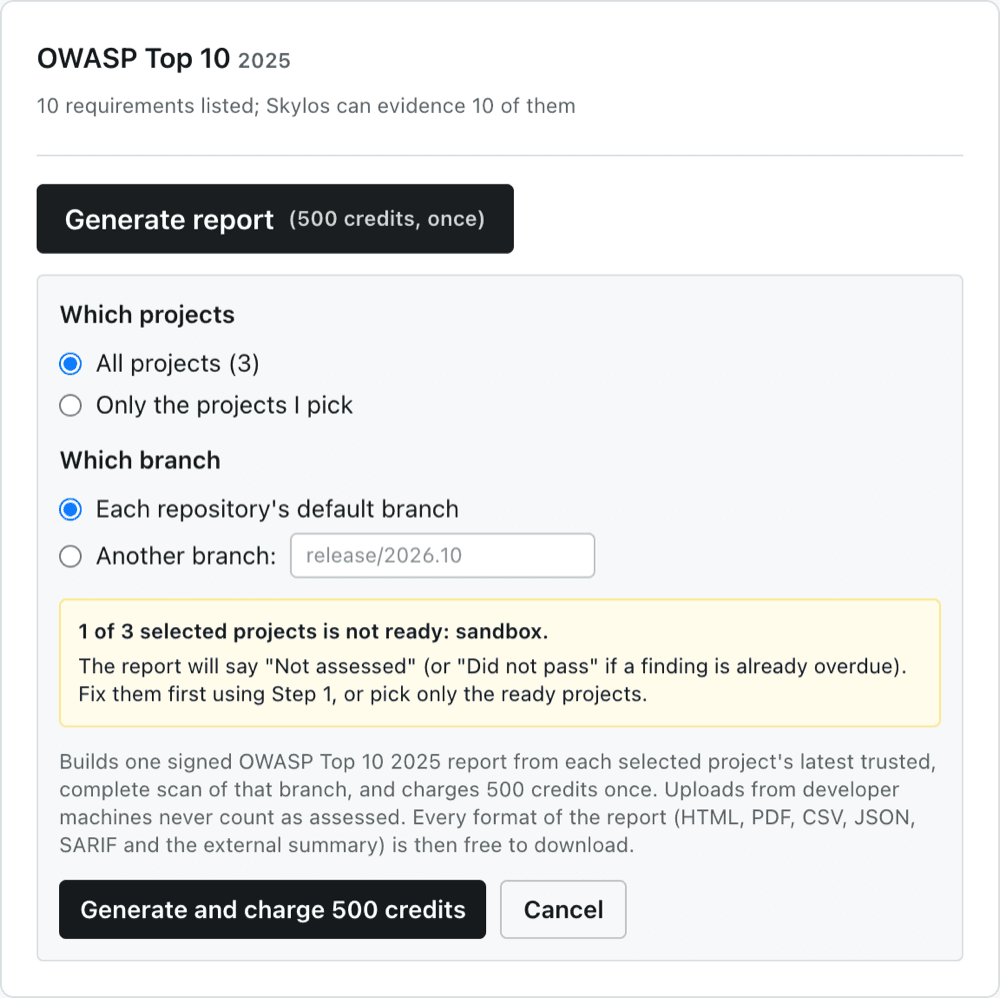
A report costs 500 credits on every plan, charged once per framework and project selection. Every format downloads free afterwards, and retrying the same request never charges twice. Any workspace member, admin or owner can generate; viewers can download existing reports. If your balance is too low, the button is replaced by a link to Billing: the Team pack (1,000 credits, $129) covers two reports, and the Builder pack does not cover one. Any purchase on Billing turns on the Workspace plan for 12 months.
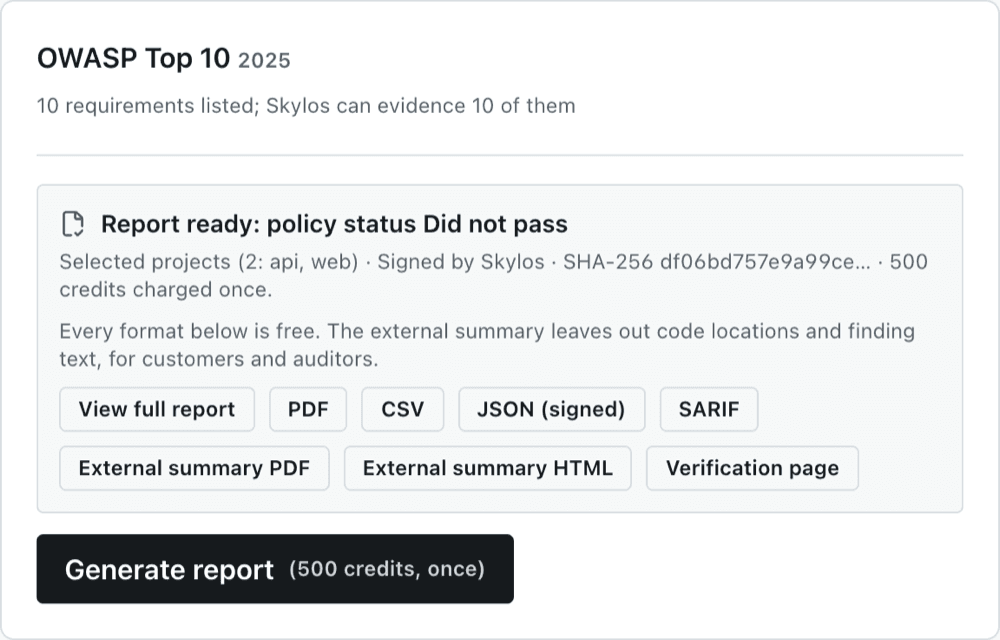
What you see: Report ready: policy status followed by the result, the scope, whether it is signed, its SHA-256 and the credits charged, with every download.
Step 7 of 9
Read the first page
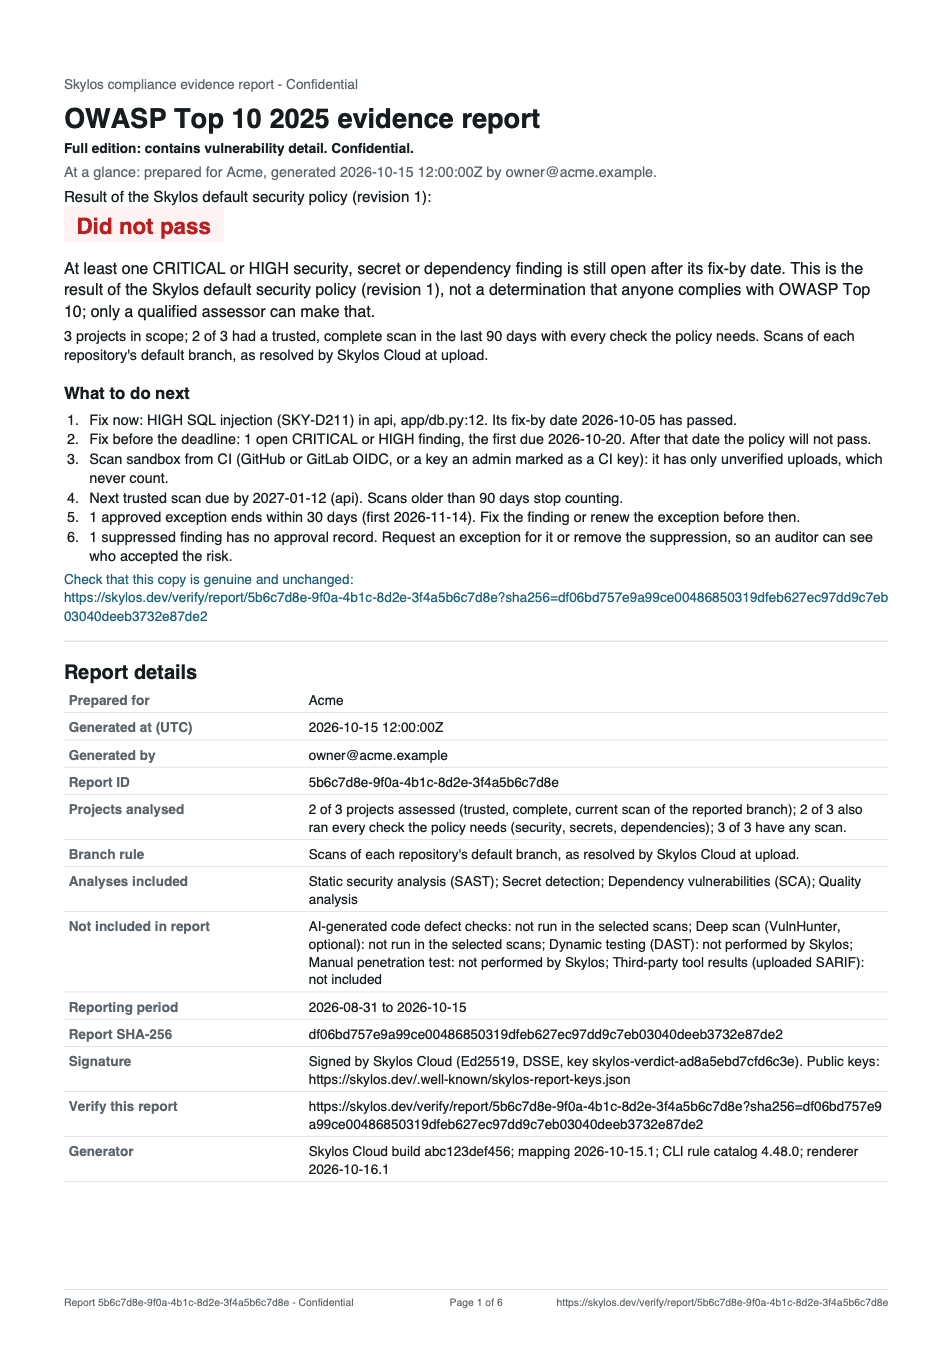
Open View full report or PDF. The first page says the result, what it means in one sentence, how many projects counted, and What to do next: overdue findings to fix, findings due soon, projects to re-scan, the next scan due date, and exceptions about to end. The section-by-section guide is below.
Step 8 of 9
Send it to your auditor
In Step 3: Download and share, every report you generated has its downloads. Keep the full edition inside your team: it contains file paths, finding text and exception justifications. Send an auditor or customer the External PDF (or External HTML) and the Verify link.
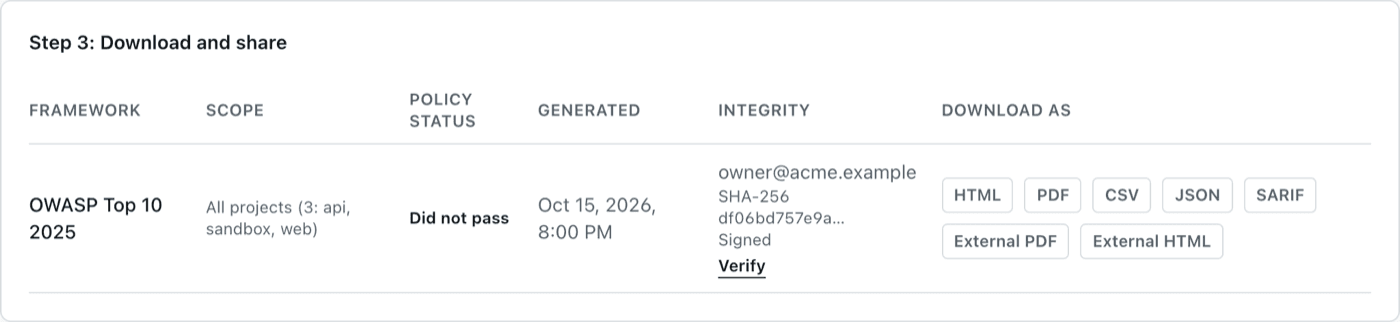
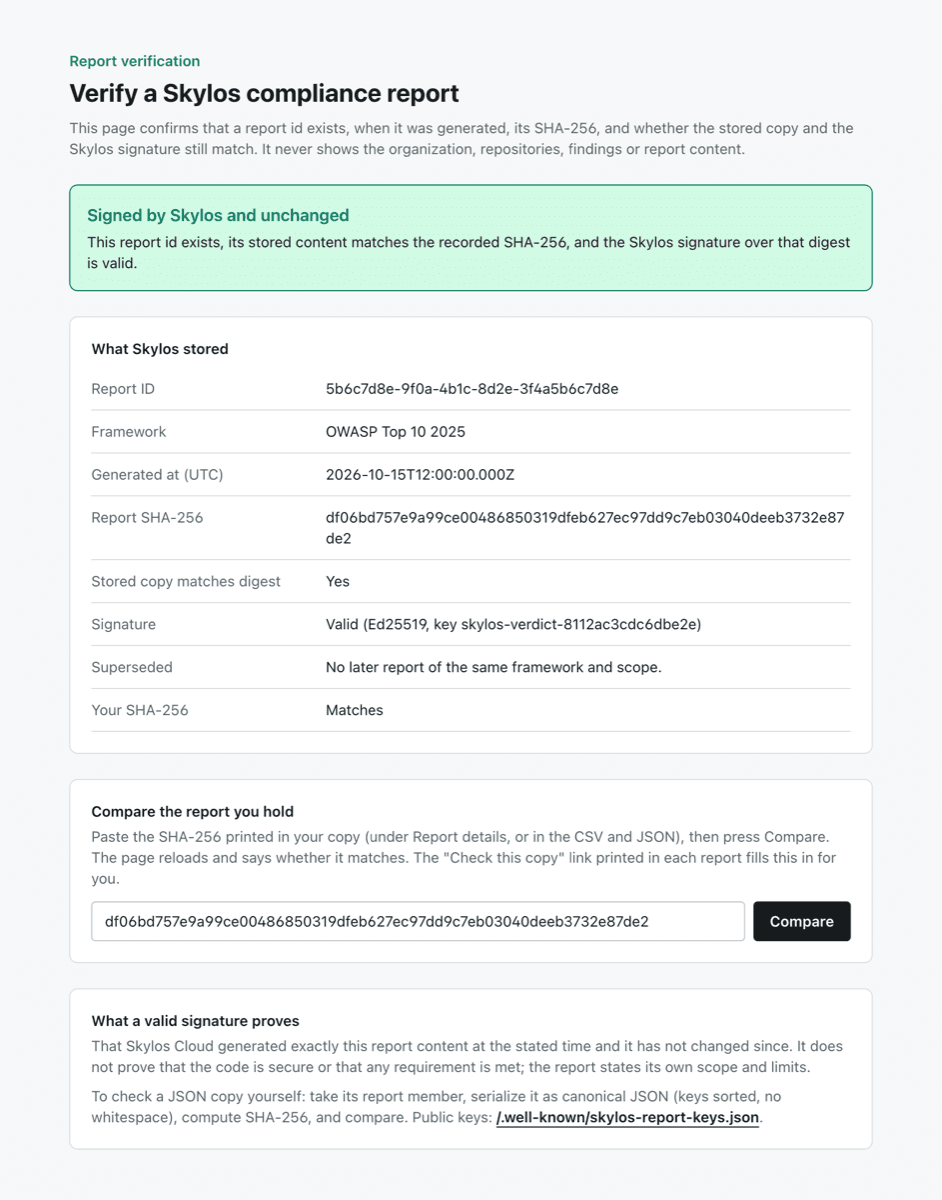
Each report also prints a Check this copy link. It opens skylos.dev/verify/report/<id> with the copy's SHA-256 filled in. The page says whether Skylos signed the report, whether the stored copy is unchanged, and whether the copy the auditor holds matches. It never shows your organization, repositories or findings.
Step 9 of 9
Keep it current
Scans older than 90 days stop counting, so keep the workflow running; the report prints when each project's next scan is due. Generate the next report with the same framework and project selection, and it compares itself with the previous one: new findings, findings no longer reported, and issues fixed with the scan and commit that confirmed it.
What the report contains
The same stored report renders as HTML, PDF, CSV, JSON (the signed original) and SARIF, in a full edition and an external summary. Sections, in order:
| Section | What it says | What an auditor does with it |
|---|---|---|
| At a glance | The result of the Skylos default security policy, one sentence on what it means, how many projects counted, and what to do next. | Reads the result and checks that every in-scope system counted. Action items become follow-ups. |
| Report details | Who it was prepared for, when and by whom, the report ID, the analyses included and not included, the reporting period, the SHA-256 and signature, and the generator versions. | Records the evidence identity and checks it on the verification page. |
| 1. Executive summary | The policy result with its reasons, the result as if no exception applied, and counts: open findings by severity, past fix-by date, suppressed, exceptions, new and fixed. | Compares the before and after results to see what accepted risks change. |
| 2. Scope and scans included | One row per project: business criticality, whether it was assessed and why, the scan ID, branch, commit, CLI version, completion time, how it was uploaded, coverage and checks. Analyses not run are listed as not included. | Ties every claim to a commit, and confirms nothing was scanned from a laptop or a side branch. |
| 3. Policy evaluation | The policy name and revision, its rules, the scan requirement (a trusted scan at least every 90 days) per project with last and next dates, and fix deadlines per severity with findings past them. | Tests the control: are scans regular, and are serious findings fixed on time? |
| 4. Standards mapping | Every requirement of the framework edition, each with a status: Open findings, No open findings from mapped rules, Scan activity recorded, Not scanned, or Not evidenced by static analysis (with the reason). | Uses it as evidence toward the requirements a code scan can touch, and plans other evidence for the rest. |
| 5. Findings | Grouped by severity: rule, CWE, project and file:line, first seen and age, fix-by date, whether the policy requires the fix, effort to fix and a recommendation. Only findings that map to the framework or that the policy covers are listed. The external edition shows counts only. | Samples findings and checks they were fixed by their dates. |
| 6. Exceptions and suppressions | Each accepted risk: who asked, who approved, why, when, and when it ends; the share of findings suppressed and how many have no approval record; and which scans hid findings themselves (inline comments or Skylos config), which the report cannot count. | Checks that accepted risks were approved by someone else and expire. A high suppression share, or findings hidden in the scan, weakens the evidence. |
| 7. Trend and fixed since last report | Changes since the previous report of the same framework and scope, and issues fixed in the period with the scan and commit that confirmed each fix. | Sees remediation over time, not a single snapshot. |
| 8. Methodology and definitions | What each analysis does and cannot see, the 90-day rule, how mappings work, and the definition of every status and result. | Understands the method without asking Skylos. |
| 9. Limitations and disclaimer | What the report does not cover and that it is not a determination of compliance. | Knows where other evidence is needed. |
| 10. Integrity and verification | The SHA-256 of the signed report, the signature, the verification URL, the Check this copy link, and what a valid signature proves. | Verifies the copy, independently if they want, with the published keys. |
The four results
The result is about the Skylos default security policy (revision 1): no open CRITICAL or HIGH security, secret or dependency finding past its fix-by date, with every project assessed by a trusted, complete scan from the last 90 days. It is never a statement that you meet a framework.
- Passed
- Every project in scope had a trusted, complete scan in the last 90 days with security, secret and dependency checks, and no CRITICAL or HIGH finding from those checks is open.
- Conditional pass
- Every project counted, and the open CRITICAL or HIGH findings are all still inside their fix-by dates.
- Did not pass
- At least one CRITICAL or HIGH security, secret or dependency finding is open past its fix-by date. This is decided even when some projects did not count.
- Not assessed
- Nothing is overdue, but at least one project has no trusted, complete, recent scan with all three checks, so no pass is given.
What a static scan can and cannot prove
It can show
- Which security weaknesses, hard-coded secrets and known-vulnerable dependencies Skylos rules found in a named commit, and when.
- That scanning ran regularly, from CI, on the whole repository.
- Whether serious findings were fixed by their deadlines, and who accepted the rest.
- That the report has not changed since Skylos generated it.
It cannot show
- That the code is secure. No open findings is not the same as no vulnerabilities.
- Business logic, runtime behaviour, deployed configuration, or whether a vulnerable dependency is reachable.
- Process, people and infrastructure controls, which most of each framework is. Those rows say "Not evidenced by static analysis" with the reason.
- Compliance. Only a qualified assessor, such as a SOC 2 auditor or a PCI QSA, can determine that. The mappings are Skylos's own.
A valid signature proves that Skylos Cloud generated exactly this report at the stated time and that it has not changed. It does not prove that the code is secure or that any requirement is met.
When a report says Not assessed
Step 1 on the Compliance page names the cause for each project. The usual ones:
- Only unverified uploads
- Scans came from a laptop or a skylos login key. Upload from CI (step 2).
- Partial scan: findings were filtered before upload
- The upload step ran with --baseline (workflows from Skylos 4.50.1 or earlier). Re-run skylos cicd init, or remove --baseline from the upload step.
- Analysis incomplete
- Some files could not be analysed. Step 1 lists each file and why (current CLI; older versions: the CI log): fix the syntax error or run CI on the language version the code needs; for Dart, install skylos[dart].
- Dependency check incomplete
- A version range no lockfile pins, a dependency file that could not be parsed, or advisories that could not be fetched. Commit a lockfile Skylos reads, or pin exact versions.
- Missing check
- The scan did not run security, secrets or dependency checks. Use -a, or turn them on in your Cloud policy.
- Scan too old
- The newest trusted scan is more than 90 days old. Push to the default branch or re-run the workflow.
- Another branch
- On a branch other than the default, only uploads with a CI key marked trusted, or from a protected GitLab branch, can count. GitHub OIDC uploads are trusted on the default branch only. CI-key uploads without the GitHub App treat main as the default branch; for any other branch name, generate with Another branch.